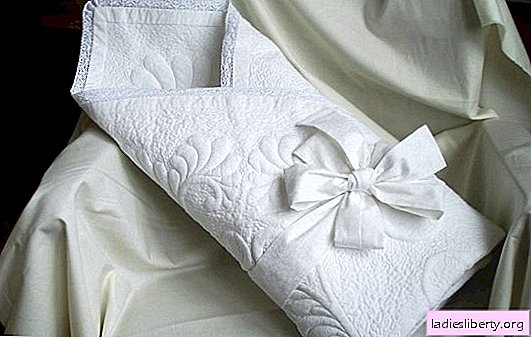
From the maternity hospital, the baby is taken away, wrapped in a beautiful blanket. It can be purchased at the store, or you can make a blanket for discharge with your own hands at home.
Do-it-yourself blanket for a newborn: features
Baby blanket for discharge, usually made in the shape of a square, therefore, all sides are equal to him. The amount of fabric depends on the estimated size of the finished blanket. The standard size of one side is from 1 to 1.25 meters.
You can rarely find rectangular baby blankets, but it will be uncomfortable to wrap the baby in them. Decorating ruffle blankets for newborns is not a mandatory attribute.
Do-it-yourself blanket for discharge: materials and methods
To make such a blanket must have in its arsenal: two types of fabric for the outer and inner sides, an elastic band and a ribbon to decorate the front side of the blanket. You may need lace for decoration. Also for work you need fixing needles or pins, scissors, tape measure and sewing machine.
Whether you will make a blanket for a newborn with your own hands or to buy does not matter, in any case, choose the fabric of the blanket correctly. It is necessary that at least one side of the blanket was made of cotton fabric and it must be the inside of which you wrap the child.
You can also make a baby blanket with your own hands from the same fabric on both sides, for example, from satin, poplin or cotton.
Luxuriously finished quilt
To make such a blanket you will need: fabric of either one or two types, lace-organza of two types (wide and narrow), filler - synthetic winterizer.

The lengths of wide lace in stock should be at least 1-1.5 meters, but the length of the narrow lace is enough 80 cm.
Cut two squares of fabric and one of the same from sintepon. The length of one side of the part has the estimated length of the blanket plus an inlet of 1 cm. For each side.
The organza in the finished product must be sewn into the seam of the blanket, so first sew the lace in its place. To do this, select one of the cut squares of fabric, put it on the table face up. At the angle at which the lace will be, position the organza along the fabric so that the lace section fits onto the fabric section, while the lush part of the organza should lie on the fabric, and not around it. Sew manually with a simple stitch. Now sew a narrow lace onto the same square of fabric in the same way. The ends of the lace cut from the sides should not stick out, wrap them and also sew to the seam.
Now you need to add all the parts to each other in the following sequence: first, the part from sintepon, on top are two parts of the fabric, folded facing each other. Fasten the parts with pins or needles so that the blanket does not lead during sewing.
Sew the blanket around the perimeter, backing 1 cm from the edge. Leave a small window of 15-20 cm. Not stitched. Turn the blanket through this window and sew it with your hands in a blind seam.
Now quilt the blanket across and along. In this case, these are two small squares located closer to the center.

You can decorate the blanket with voluminous flowers made of the same fabric.
Children's blanket with a terry center

For this blanket you will need two kinds of fabric and a ribbon to decorate the blankets from the outside. The interior of this blanket is special; it is made of cotton terry cloth. This is sold in fabric stores marked children's. You can use a children's blanket on this part of the blanket.
From the front fabric, cut a long strip 12-15 cm wide., Fold it in half lengthwise and stitch along the cut edge. Now sew the resulting tape with your hands to the square fabric part with a simple seam. Spread a piece of the outer fabric face up on a flat surface. The resulting tape is placed on it along the perimeter of the fabric so that the seam of the tape coincides with the seam of the fabric, and its free part lies on the fabric, and not around. When sewing, assemble the tape in large or small assemblies.
Now you need to separately make the part for the inside of the blanket. To do this, cut a square of terry cloth smaller than the size of the future blanket. The difference should be 10-12 cm from each side. Complete the missing length with a second fabric, sewing it with stripes around the terry square.
Optionally, one corner of the blanket can be made rounded. In this case, make a rounding in advance on the corresponding terry piece of fabric.
Connect a synthetic winterizer, and on top two pieces of fabric folded facing each other. Sewn in advance lace should be inside between the layers. Connect all the parts together with needles or pins and sew on a sewing machine, retreating one centimeter from the edge. Leave the window unstitched, turn the blanket through it and sew it manually with a blind seam.
If you want to see the pattern on the front of the blanket, then do it in advance before you start stitching all the details. As a pattern, you can use a thin satin or decorative ribbon, stitching it to the facial tissue.
Double-sided blanket for discharge from the hospital
This is an interesting option for a handmade blanket for a newborn. For him you will need a fabric of two colors, but of the same quality, synthetic winterizer and elastic for a belt or flypaper for fixing the edges of the convolution. Choose two opposite colors for such a blanket, for example blue and white, gray and red.

Cut out of two fabrics and a synthetic winterizer the same square the size of the estimated size of the blanket plus one centimeter inlet for each edge. Fold the synthetic winterizer on a flat surface, and on top of it are two parts from different fabrics facing each other.
Sew the seams and leave 20 cm of fabric unstitched. Turn the blanket through this gap and sew manually with a blind seam. The blanket is ready. For greater durability, quilt it obliquely with rhombs or squares.
If you do not want to make a belt or bow for this blanket, you can sew on Velcro, for which the folded blanket clings and does not unfold. However, in the future, Velcro can cling to an already grown baby and scratch it. Therefore, it is better to make a belt. It can also be double-sided for contrast.

Cut out for the belt two strips 12 cm wide, one from each type of fabric and sew first face to face, then twist and stitch the edges together. Leave a small gap in order to insert an elastic band into it. Sew up the clearance with your hands. A volumetric bow or flower made of the same fabric can be sewn onto the belt.
How to make a baby blanket with your own hands: tips from professionals
• The material of which the external decorative side is made does not matter, because it will not lean against the child’s body. That is why it can be both satin and silk.
• Make a belt or elastic band with which to fix the wrapped blanket from the same fabric. If there is no desire to spend energy on a belt, then for these purposes a wide satin ribbon is also suitable.