Graceful and elegant rose - the universally recognized queen of flowers.
Legends are written about her, poems and songs are dedicated to her.
In ancient Greece, a rose was considered a gift from the gods.
An amazing flower emerged from the snow-white foam that covered the body of Aphrodite.
The gods, fascinated by such beauty, gave him a wonderful aroma.
Rosebeds are strewn with the wedding bed and the path of the victorious warriors.
These luxurious flowers adorn the interior and clothing, accessories and household plots.
What tapes can I make roses with at home?
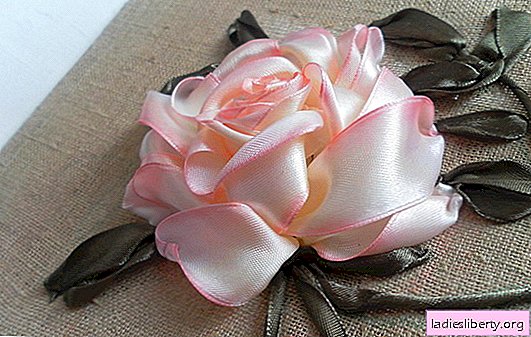
Needlewomen often use nylon or satin ribbons of different colors and widths in their work. They decorate clothes, decorate the interior, embroider whole pictures. From multi-colored satin ribbons of different widths, we ourselves will make several options for the delicate and spectacular buds and flowers of roses.
We will need satin ribbons 50 cm long and 3-4 cm wide. If you have wider ribbons, then their length should be longer. We also need a regular needle and thread in the color of the tape.
1. Fold the tape along, exactly edge to edge. Sew the workpiece close to the edge with a “forward needle” seam. In this case, the end parts are stitched at an angle of 45º. The excess part of the tape is trimmed to the ends and we singe it using the flame of a candle or a lighter. This is necessary so that in the future our rose does not mess up. The ends of the basting thread are left long enough so that they can be grasped and pulled.

2. From one edge of the workpiece, gently pull the thread, make two or three tight turns of tape and fix them. This will be the core of our flower.

3. Next, again gently tighten the basting thread and make the following turns. Now we wind the tape loosely and fix it after each revolution. Gently hem the edges of the ribbon, finishing work, and fluff the petals. Small pieces of green ribbon can be folded. Our rose is ready.

Another step-by-step instruction on how to make roses from satin ribbons with your own hands
From a thin ribbon 1-2 cm wide you can also make a charming flower. We use a satin ribbon 50 cm long.
1. Find the middle and fold the halves of the tape at an angle of 900.

2. The lower end of the tape shift up. In the center of the workpiece, a square is obtained. And again, the lower end of the tape, but now on the other hand, we throw it up. Do not forget to hold the blank with your fingers: satin ribbon is a very slippery material.

3. Here, finally, the whole tape is folded into a square. Holding both ends of the tape, release the workpiece. We should get such a peculiar spiral.

4. Gently pull on one, any, end of the tape. At this stage, it is important not to pull the ribbon, otherwise the rose will fall apart. We turn the product over, tie a double knot, cut off the excess end and singe the edges of the tape so that they do not fray. A small charming rose is ready.

DIY step-by-step embroidery of roses from a ribbon
Satin ribbons can be embroidered on almost any material: canvas, chintz, silk, drape, denim. One condition - the material should not be stretched during operation. Skilled craftswomen decorate bed and table linen, outerwear and delicate blouses, drapes and pillows, hats and gloves, bags and belts with such embroidery.
To embroider a rose, we need two needles, an ordinary and a tapestry with a large eye, a colored satin ribbon 0.5-1 cm wide and a simple thread of the same color. All this can be purchased at any needlework store. The length of the piece of tape should be 40-50 cm, the longer one will fray in the embroidery process.
1. First you need to prepare the ribbon for embroidery: one edge is scorched on a fire so that it does not fray, the other is cut obliquely so that it is easy to put into the needle. The oblique edge does not need to be scorched, since fused pieces of material can deform the fabric.
2. On the selected material, with a thread, embroider an asterisk with five rays coming from one point. The longer the rays are, the larger the rose will be, and the more we need ribbons. The best option is 3-4 cm, with longer rays the flower will look sloppy.

3. The tape, put into a needle with a large eye, is displayed from the wrong side of the product to the front between the beams in close proximity to the center. The tip remaining on the inside can then be carefully hemmed so that it does not come out and spoil the work. We begin to braid our star with a ribbon: one stitch above the beam, the other under it. And so we alternate to the end of the asterisk. In this case, it must be ensured that the tape always lies on the front, shiny side, and do not tighten the coils. If the tape is not enough, then we withdraw the tip to the wrong side, and from this place we embroider the next piece.

4. Having finished the embroidery, we remove the tape on the wrong side, cut, hem all the left ends. With a green ribbon, we make several single stitches of different lengths. These will be the leaves of our flower. Spread the satin petals - our rose is ready. Such a flower will decorate a summer bag or hat, dress or curtains, a parasol or a light coat.

In the hands of real craftswomen, satin ribbons can turn into a wedding bouquet, an element of room decor, decoration of clothes or an original accessory. They can decorate a headband or hair clip, children's clothes, combine several things in an exclusive ensemble. The pictures embroidered with kapron or satin ribbons amaze with the brightness of colors, originality and originality. They can be a wonderful gift for family and friends.